Monday, November 30, 2009

The best BLT

Hello everyone,


I'd like to share with you one of my favourite ever comfort foods - the BLT with a twist. I have proven on many occasions that you can eat this at any time of day, and it never fails to hit the spot.


You need:


A bagel, two rashers of bacon, half a tomato (sliced), two slices of processed cheese, and a handful of rocket. Or if you're really hungry, double it up.


Grill the bacon rashers, and after a couple of minutes, add your tomato slices to the grill. I have a George Forman grill and I adore it. I love the way the fat ooozes out and away from the food.

At the same time, toast the bagels (sliced in half). When they come out of the toaster, immediately place a slice of cheese on each half.


Then add a handful of rocket to two of them, and the grilled tomato slices on the other.


Top with the bacon slices and piece together your halves so each contains bacon, rocket and tomato.


Slap it all together.
Yummmmm. I forgot to take a picture of the finished article, but rest assured it tasted fabulous!
Oh, and if you're feeling really decadent you can add some avocado. Even better!

Wednesday, November 25, 2009

BROOKE'S HOT WAAANGS

Hot Wings is one of those things that took quite a bit of trial and error until I got them down pat. One of the first mistakes I made was cooking them in my deep fryer. When I cooked my wings in my deep fryer the skin didn't crisp up enough to be able to stand up to the sauce. So I thought I needed to cook them longer, so I ended up with over fried chicken with squishy skin hot wings - not good eats!


So I will tell you what I do to make Brooke's Hot Waaangs (yes, you must say "waaangs not wings). Please note that I did not include amounts, it just depends on how much you are cooking and it isn't an exact science.

INGREDIENTS
  • Chicken Wings
  • Flour
  • Oil
  • Wing Sauce
  • Butter
DIRECTIONS
  1. Add enough oil in skillet to fry chicken wings, I figure enough so that half the chicken is under the oil, and when flipped the other half will be completely under oil. Just use your eye, it's not that hard :) Let this start heating up, I set my burner to med high.
  2. Rinse chicken and PAT DRY with a cloth. Dry chicken makes for a crisper skin.
  3. Dredge chicken in flour until lightly coated, place on wire rack until ready to add to the frying pan.
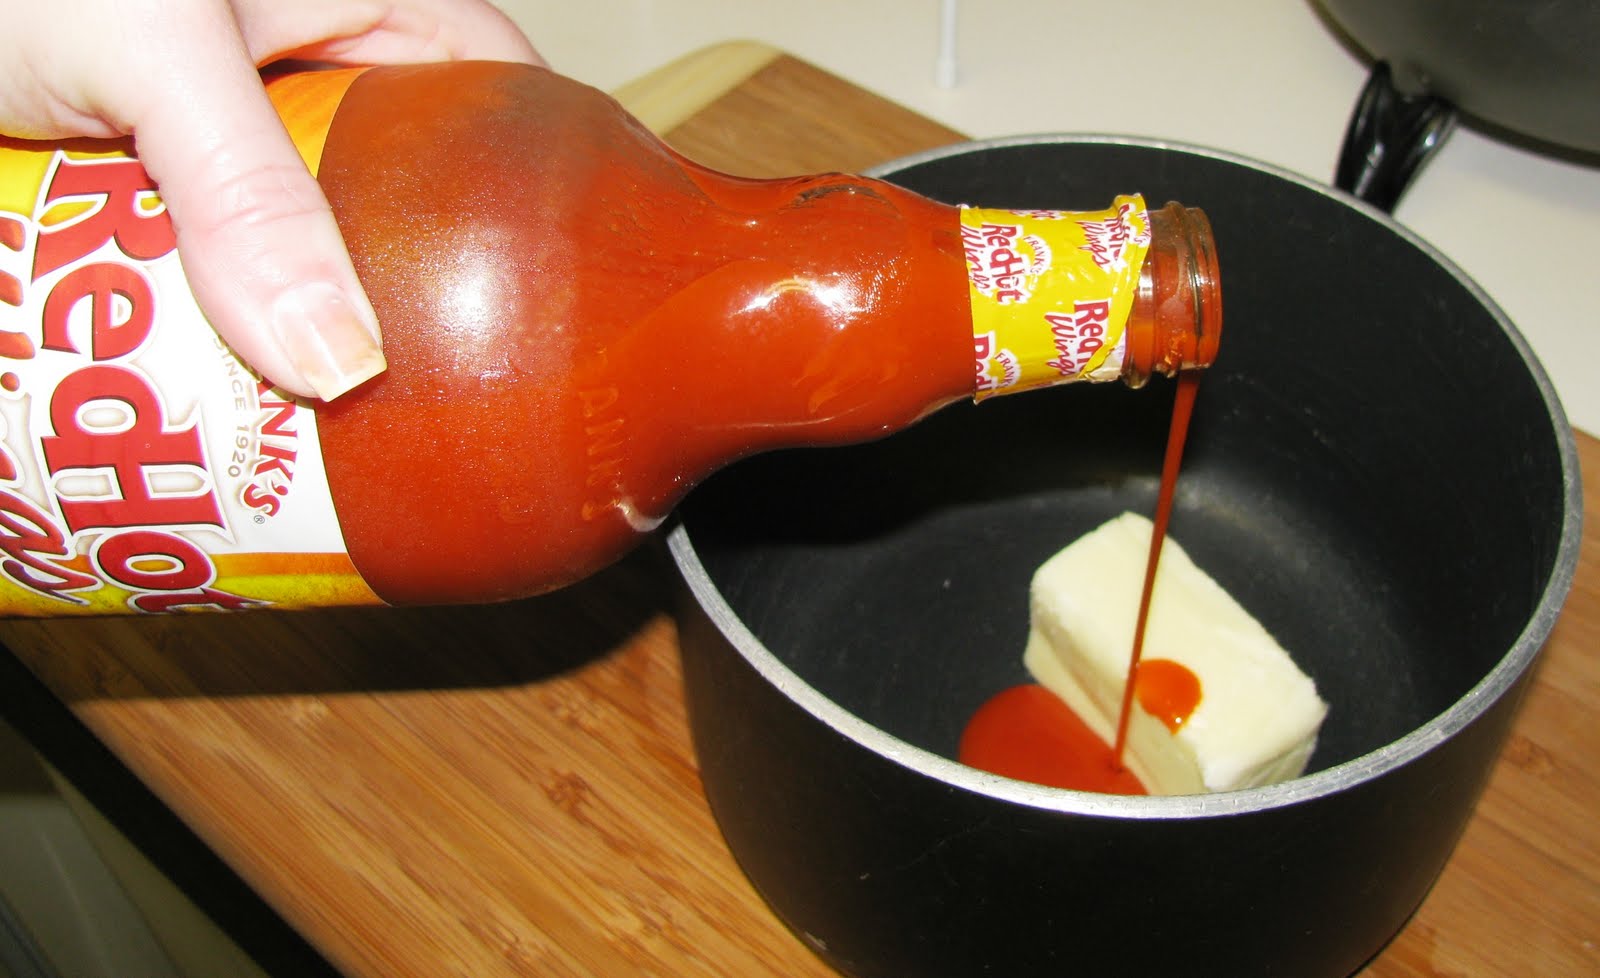
  4. In small sauce pan add butter and hot sauce and cook until heated through.
  5. Once your oil in your skillet is nice and hot, start adding chicken wings. Don't over crowd your pan!!
  6. When chicken is golden brown, flip and cook the other side till golden brown. Remove and let drain on another wire rack.
  7. Place cooked chicken in bowl and drizzle with hot sauce and butter mixture. Swish chicken around in bowl until thoroughly coated with the sauce.
  8. Using tongs, place chicken on plate and pour the remaining sauce in bowl back into sauce pan to be used on the next batch of hot wings.
  9. Serve with celery sticks and ranch or blue cheese dipping sauces.


I just packages of whole wings. You can purchase the drummettes, or cut your whole wings down. I usually will cut my own wings up since it is cheaper, and will do it if I am fixing them for others to enjoy. If it is just me and Ricco eating them, I don't bother separating the wing from the drumette and just cook them whole, and we just separate them while we eat them. Don't eat the wing tips though. It's really just your choice.


Sprinkle enough flour in a bowl over the wings and toss to lightly coat rinsed and PATTED DRY wings. Don't skip this step, it really helps to crisp up the skin which makes for a really good hot wing.


Just a light coating of flour is all you need! I don't add any seasoning to the flour since the wings will get plenty of flavor from the sauce.


Transfer to a wire rack until ready to cook. This just helps keep the flour on the wings from getting gunky and turning to a white sticky mess. If you don't have a wire rack, place them in single layer on some paper towels.


While the oil is still heating up and I have all the wings floured, I start the sauce going. I like Franks brand Hot Wing sauce, or another I like is to pick up the sauce from Buffalo Hot Wings. You can purchase these online or direct from the store. My favorite is the Parmesan Garlic, I could eat those until the cows come home! As far as how much butter, it depends on how much sauce you are using. For about the two cups I used, you need at least 1/2 to 3/4 of a stick of butter, just depends on how much you like the taste of butter. This only has about 1/2 a stick since it was the last of the butter I had, otherwise I would have used a bit more.


For some reason I forgot to get pics of the chicken cooking in the skillet! Whoops! But I think most of you know what that looks like anyway. Just add the chicken, making sure that there is room between each wing, don't over crowd your pan. It just takes them longer to cook and they just don't crisp as well. Mine took about 7 minutes on each side to cook through.


Once your chicken is cooked, transfer the cooked pieces to a wire rack to drain off any excess oil, this will also help keep the skins nice and crisp. As you can see, I just put my wire rack direct in my sink, that way any oil just drained right there for easy clean up. Again, no wire rack, just drain on paper towels.


Steam Vision!! These waaangs were so hot they fogged up my camera!


After letting the wings drain for a few minutes, place them in a bowl and drizzle with the hot wing sauce. Swish the wings around in the bowl until covered. Don't get to wild with the swishing, or you will end up with little red dots all over. I even use my tongs to get in there and turn the wings in the sauce. When you are ready to plate the waaangs, take them out with tongs, don't just dump them, too much sauce left on them will soften the skin up and ruin the crispiness we have been aiming for. Then just transfer the unused sauce back into sauce pan to reheat and be used on the next batch of wings to come out of the skillet.


While my wings are cooking I like to make my ranch dipping sauce. I just use a package of Hidden Valley Ranch mix and a container of sour cream. This time I added some cut up green onions since I had them on hand.


I also like to have cut celery to serve with my wings. One trick I do to keep celery nice and juicy is to cut the stalks into small sticks and them keep them stored in a Tupperware container filled with water. the celery just soak up the water and are crisp and juicy when I am ready to use them.


Now, you are ready to eat Brooke's Hot Waaangs! Enjoy!!

Tuesday, November 24, 2009

THE BEST SWEET POTATO PIE

Sweet Potato Pie is what my boyfriend likes, he won't eat pumpkin pie. I personally don't think I could really tell the difference if I was blindfolded and given a bite of each and asked which was which. They both taste pretty similar to me. Anyway, since being with my boyfriend I usually get sweet potato pies since that is what he likes and it doesn't matter to me. Last year was my first attempt at making one and it turned out just ok. I wasn't impressed and neither was he, lol. So this year I went with a new recipe and I think I have a winner winner chicken dinner here! Here is what you need and how to make it:


Ingredients
  • 1 (1 pound) sweet potato
  • 1/2 cup butter, softened
  • 1/2 cup white sugar
  • 1/2 cup brown sugar
  • 1/2 cup evaporated milk
  • 2 eggs
  • 1/2 teaspoon ground nutmeg
  • 1/2 teaspoon ground cinnamon
  • 1 teaspoon vanilla extract
  • 1 tablespoon flour
  • 2 tablespoons lemon juice
  • 1 (9 inch) unbaked DEEP DISH pie crust
Directions
  • Boil sweet potato whole in skin for 40 to 50 minutes, or until done. Run cold water over the sweet potato, and remove the skin.
  • Break apart sweet potato in a bowl. Add butter, and mix well with mixer. Stir in sugars, milk, eggs, nutmeg, cinnamon, vanilla, flour and lemon juice. Beat on medium speed until mixture is smooth. Pour filling into an unbaked pie crust.
  • Bake at 350 degrees F (175 degrees C) for 55 to 60 minutes, or until knife inserted in center comes out clean. Pie will puff up like a souffle, and then will sink down as it cools.

First, you need to boil your potatoes. I started doing this and forgot to take pictures as I was going along, whoops! I just buy frozen pre-made crusts. They turn out just as good without all the headache of making your own. It's one of those things that I don't really have an interest in perfecting, I guess because I don't make enough pies to warrant it. Since I bought a two pack of crusts, I doubled this recipe.


After you get your potatoes peeled, put them in your mixing bowl with butter and mix them up. This smelled really good!


Dump in the rest of the ingredients. And give them a good mix. Pour mix into an unbaked pie crust.


My pies in the oven ready for baking. I place my pies on a cookie sheet to catch any spills, which I most definitely had. I usually line the pan with foil for easier clean up. I forgot to last night - oops!


You can see I fill my pies pretty full. When it cooks, the tops do puff up, but it doesn't cause the liquid to spill out over the sides too much, so I fill em up and try to use all the mix I made. The amount of mix can sometimes vary depending on the size of your sweet potatoes. Also, please note I use the deep dish crusts. Last year I only got the regular crusts and two potatoes made four pies. Which was too many for just my family. So unless you are bringing the pies somewhere and need several, I would go with a deep dish crust.

Also, to keep the crusts from getting to brown while cooking, when they reach the color I like, I put a large piece of foil over the tops of the pies. This keeps them from browning any more while baking. I just place the foil on the tops, don't press down or even try to get the foil "wrapped" around the pies, just lay it on top.


Take the pies out and let them cool on a wire rack. I taste tested some of the spillage from the pie on the cookie sheet and gave a bite to Little, who said "Good, tastes real good". When I tasted my little nibble, it really was good. Very sweet and tasty. I was getting excited that this recipe just might be "it".


So while the pie was still just a tad warm me and my son had some. It was really, really good. I thought it was sweet enough to NOT need whip cream, which to me has always been a problem with pumpkin pie, it needs whip cream to sweeten it up. Of course that didn't stop me and Little from topping our pies off with just a bit of whip cream! We actually even went back and had another slice each! What you see missing from the pie above is the damage just me and my 7 yr old son did to one pie.


As far as passing the boyfriend (Ricco) test - I think I got an "A". He says that I did a damn good job and even wants to be sure and save some to compare it with against his moms! He is off work today, so I am curious to see how much pie will be left by the time I get home tonight . . .

BACON & AVOCADO STUFFED GRAPE TOMATOES

Yum, Yummy yum YUM!! That is what these little babies are! These are super easy to prepare, use very few ingredients and are tasty.

I saw a picture of these ( a little different version) on some blog or website and thought they looked yummy. When I wanted to make them, I couldn't remember where I saw them or what was in them.

So after a little searching, I came up with my own recipe for these.

INGREDIENTS:
  • 2 Pints Grape (or Cherry) Tomatoes
  • 2 Avocados
  • 1/2 Pkg of Bacon (about 8-10 slices), cooked crispy
  • 1/2 C Mayo
  • Salt & Pepper to taste

DIRECTIONS:
  1. Cut a small slice off the top of the tomato.
  2. Using a knife, core out the seeds from the inside.
  3. Turn cored tomatoes upside down on a paper towel to drain and dry, about 30 minutes.
  4. Chop the avocados into small chunks. Remember to cut them small enough to fit inside your little tomatoes. Place in bowl.
  5. Cut your crispy cooked bacon into small chunks, like the avocado. Add to the bowl.
  6. Add your mayo to the bowl.
  7. Sprinkle with salt and pepper, and mix it up.
  8. Transfer mixture to a small zip lock baggie, and cut the tip of the bag off.
  9. Squeeze mixture into tomatoes.


I chose Grape tomatoes since they were bigger than the Cherry tomatoes that my local Walmart offered. I wanted the biggest opening I could get to stuff these with, which makes it easier.


I actually did this step a day in advance. After cutting and letting them drain and dry I placed them in a Tupperware container and placed them in the fridge. They held up great.


This is only one avocado cut up. Make sure your avocado is nice and ripe.


I can almost taste that bacon through the screen!!! I cook my bacon in the oven. It is fast and I don't have to babysit the bacon in the skillet when I cook it on the stove top. I preheat the oven to 350 and lay the slices (in a single layer) on a foil covered baking sheet and cook for about 30 minutes, it depends on how thick the bacon is cut. This bacon was thin and done perfectly in 30 minutes.


Again with the closeup, what is better than bacon?? Chop this bacon into SMALL pieces! I didn't cut my bacon small enough and it kept trying to clog my bag up when I was ready to squeeze. So please make sure to chop that bacon up small!


Toss all ingredients (minus the tomatoes, of course) into a bowl and mix with a spoon.


Looks yummy doesn't it? Believe me, it tastes as good as it looks!


Spoon mixture into a sandwich size zip lock baggie.


Cut off a small corner of the bag. I tried to keep it about the same size as the opening of the tomatoes I cut, so that it would squeeze right inside them and not all over them. Again, like I said, if the bacon or avocado's aren't cut small enough, they will clog your bag, and then you have to pull the chunk of bacon out and eat it. . . . that's what you're supposed to do, right?


Tada! Finding a way to make these stand up is the real challenge. I did see where someone had used the green leaf lettuce to cover the plate and that helped hold the tomatoes in place. I just crinkled up some foil since I wasn't serving these at a party or anything, I was just making them for the family to eat. It worked pretty good for holding them up.

I can honestly say I ate about 6 of these before I even had 2 plated, lol.

Monday, November 23, 2009

My Stash!

Hello all and thankyou for following us! Very exciting!
Before I get started with the main event, I wanted to show you a couple of things that are very important to me. My fridge, and my storecupboard.


I always thought a storecupboard was something only grown-ups had. But regardless of maturity, I seem to have acquired one along the way. And here it is.

You can see various essentials here. Ketchup, BBQ sauce, rock salt, vinegar, Marmite, soy sauce, Golden Syrup, and other good things. I'd like to say though that the Bisto is nothing to do with me.

The bottom shelf has all our herbs and spices. I could not live in a world where there was no flavour and I regularly find myself adding the contents of many of these in a lot of my recipes. You probably can't tell here but there are about fifty jars of spices and herbs here. Everything from garam masala to garlic salt.


And onto the main event! The fridge!
Here you can see the fridge after a weekly shop and before we put the beer in! This is everything I need to get me through a week. All the things I love: beef, bacon, mushrooms, cheeses, mayonnaise, water, avocado, peppers, broccoli, butter, bread and creme fraiche. You'll see a LOT of creme fraiche in upcoming posts.
So there you have it. When I'm not painting my nails or blogging, you'll find me here, scavenging around for a snack, or embarking on some sort of dinner mission. I hope you enjoyed having a nose in my cupboards!

NON-TRADITIONAL THANKSGIVING MEAL

Between my sisters and I and our boyfriends, husbands, etc, spending Thanksgiving with everyone can be difficult, so my Mom planned a Thanksgiving meal for this past Sunday. She decided to go with a non-traditional theme, on the menu she had:

  • Brie with Apricot (or peach, can't remember) fruit preserves and toasted almonds
  • Brisket
  • Green Bean Casserole
  • Roasted Potatoes
  • Roasted Red Onion
  • Rolls
  • Italian Creme Cake


I just love this picture of Ollie looking up at Ricco.


If you see anything here you would like the recipe for, please let me know in the comments and I will post it up for you!


Thanks Mom - it was a great meal! Mom asked us if we would like to name one thing we were thankful for in the last year, and I would like to share what I have been thankful for.

I am thankful for my Mom! Without her, this past year would have been very hard on me, she has unselfishly helped me out even when it meant that she would have to do without things for her. Thank you Mom - I don't know where I would be without you! I love you!!!!